# How to Create and Launch dApp: Complete Tutorial
This tutorial provides steps to develop and launch sample dApp based on Waves blockchain. You can then repeat the steps to create more advanced dApps.
The sample dApp you'll create is the Waves Magic 8 Ball application that generates pseudorandom answers. You will use Waves IDE to develop and test dApp and then use JavaScript to deploy the web app that calls the dApp functions.
Learn more about dApp features
# Roadmap
- Create a dApp account.
- Write a dApp script.
- Assign the script to the dApp account.
- Test the script.
- Release a real-world application.
# Step 1. Create dApp Account
Open Waves IDE.
Click
 and make sure that Testnet is selected.
Click Add account → Generate new account.
Click Show seed and private key and backup the seed phrase to a secure location. You will need the seed phrase to restore access to the account.
Top up account balance. It's free on Testnet.
• Copy address: click account name and then click
 .
.• Go to Waves Faucet, paste address, and click Request WAVES.
# Step 2. Write dApp Script
- Click
 and select dApp script.
 - Replace the automatically generated code with your script.
The file is saved in Waves IDE automatically.
You can copy Waves Magic 8 Ball script from IDE library: Library → ride4dapps → 8ball → ride → 8ball.ride.
Script code
{-# STDLIB_VERSION 8 #-}
{-# CONTENT_TYPE DAPP #-}
{-# SCRIPT_TYPE ACCOUNT #-}

# Determine the number and list of responses
let answersCount = 20
let answers =
  ["It is certain.",
  "It is decidedly so.",
  "Without a doubt.",
  "Yes - definitely.",
  "You may rely on it.",
  "As I see it, yes.",
  "Most likely.",
  "Outlook good.",
  "Yes.",
  "Signs point to yes.",
  "Reply hazy, try again.",
  "Ask again later.",
  "Better not tell you now.",
  "Cannot predict now.",
  "Concentrate and ask again.",
  "Don't count on it.",
  "My reply is no.",
  "My sources say no.",
  "Outlook not so good.",
  "Very doubtful."]

# Function to generate pseudo-random answers
func getAnswer(question: String, previousAnswer: String) = {
  let hash = sha256(toBytes(question + previousAnswer))
  let index = toInt(hash)
  answers[index % answersCount]
}

# Function to get previous response from storage
func getPreviousAnswer(address: String) = {
  match getString(this, address + "_a") {
    case a: String => a
    case _ => address
  }
}

# Callable function
@Callable(i)
func tellme(question: String) = {
  # Get the address of the user who calls the contract
  let callerAddress = i.caller.toString()
  # Get a pseudo-random answer
  let answer = getAnswer(question, getPreviousAnswer(callerAddress))
  # Write data to the storage
  [
    StringEntry(callerAddress + "_q", question),
    StringEntry(callerAddress + "_a", answer)
  ]
}
Explanation of the code
dApp-script should start with directives:
{-# STDLIB_VERSION 8 #-}
{-# CONTENT_TYPE DAPP #-}
{-# SCRIPT_TYPE ACCOUNT #-}
After directives you can declare variables and auxiliary functions.
Callable functions should be marked with the @Callable(i) annotation. The i object contains invoke script transaction fields that the callable function can use. In the example we use the i.caller.bytes field that contains address of user account that called the function.
Callable function result is a set of script actions. In the example, the function performs two StringEntry actions that add or modify a string type record in the dApp data store.
For more information about the structure of the dApp script, see the Structure of dApp Script.
# Step 3. Assign Script to Account
To assign dApp script to the account, send a set script transaction from this account. The fee for the set script transaction is 0.01 WAVES.
You can send a set script transaction directly from Waves IDE:
- Open dApp script and click Deploy.
- Click Add sign to sign the transaction. Then click Publish.
You can check the assigned script in Waves Explorer:
- Go to https://wavesexplorer.com/.
- In the top right menu, select Testnet.
- Use search bar to find the dApp account by address.
- Switch to Script tab.
Now dApp is ready — users can call dApp functions using invoke script transactions.
# Step 4. Test Script
To test the dApp script send an invoke script transaction. The fee for the script invocation starts from 0.005 WAVES and depends on the number of smart assets involved (in this example, smart assets are not used). Fee calculation is described in the Transaction Fee article.
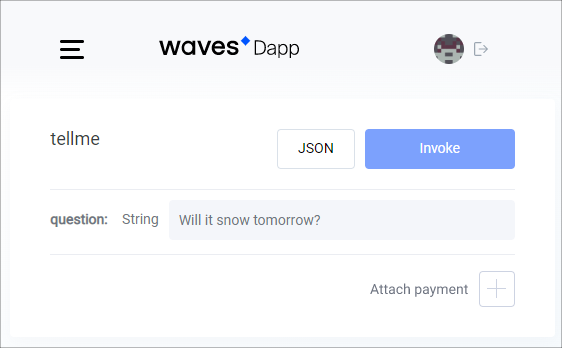
For manual testing, use Waves Dapp Ui:
Create a test user account in the recommended wallet app, for example:
• in WX Network for Testnet,
• or in the Keeper Wallet browser extension (switch to Testnet before creating the account).
Top up your account balance using Waves Faucet.
In Waves Dapp Ui paste the dApp address.
Click Sign In and connect the test user's wallet.
Set the parameters of the callable function and attach payments, if required.
For running test scripts, use Waves IDE. Test scripts support the following functions:
Create a test user account and top up its balance as described in Step 1.
Click
and select Test.Replace the automatically generated code with your script.
You can copy Waves Magic 8 Ball test from IDE library: Library → ride4dapps → 8ball → tests → 8ball_test.js. Remember to replace the
ballAddressvalue with the address of your dApp.Click Run full test.
Test code
describe('8 ball', () => {

    const ballAddress = "3MxBZbnN8Z8sbYjjL5N3oG5C8nWq9NMeCEm"

    const question = "Test" + Date.now()

    const tx = invokeScript({fee: 500000, dApp: ballAddress, call:{function:"tellme", args:[{"type": "string", "value": question}]}, payment: null})


    it('Tx is mined in block', async function(){

        await broadcast(tx)

        await waitForTx(tx.id)

    })


    it('Question is in ball', async function(){

        await accountDataByKey(address()+"_q", ballAddress)

            .then(reslove => expect(reslove.value).to.equal(question))

    })

})
You can check the result of script execution in Waves Explorer:
- Go to https://wavesexplorer.com/.
- In the top right menu, select Testnet.
- Use search bar to find the dApp account by address.
- Switch to Data tab.
# Step 5. Release the real-world application
To release your app:
- Deploy the wep app that allows user to sign and send an invoke script transaction by simply clicking the button.
- Add your dApp on Mainnet.
- Register your application in dApp directories to make it known to as many users as possible!
# 5.1. Deploy Web App
To invoke dApp functions on behalf of a real user use Signer TypeScript/JavaScript library. Signer enables signing and broadcasting transactions without asking user's seed phrase or private key.
Invocation code
await signer.invoke({

    dApp: ballAddress,

    call: {

        function: "tellme",

        args:[{"type": "string", "value": question}]

    }

}).broadcast();
# 5.2. Add dApp on Mainnet
- In Waves IDE click and switch to Mainnet.
- Create dApp account on Mainnet as described in Step 1.
- Top up account balance to pay the fee for the script setup. See the How to Get WAVES section.
- Attach dApp script to the account as described in Step 3.
dApp on Mainnet will have a different address — remember to change the address in your web app. In addition, replace the node address to https://nodes.wavesnodes.com.
💡 You can enable sponsorship to make the application free for users and pay the script invocations fees yourself.
# 5.3. Register on DappRadar
DappRadar is the leading platform for decentralized application discovery and analysis. Submit your dApp there to promote it.
# What's next
Waves public nodes have limitations on the number of requests per second. So when your application becomes popular, we recommend to launch your own node and send invoke script transactions to it.