waves_logo Docs
  • Overview
    Overview
  • How-to Guides
    • Reading Blockchain Data
      Reading Blockchain Data
    • Creating & Broadcasting Transactions
      Creating & Broadcasting Transactions
    • Tokenization
      Tokenization
    • Airdrop
      Airdrop
    • Payments
      Payments
    • Exchange Tokens
      Exchange Tokens
    • Simple Voting
      Simple Voting
    • List as argument
      List as argument
    How-to Guides
  • Waves Smart Contracts
    Waves Smart Contracts
  • dApp
    • Creating & Launching dApp
      Creating & Launching dApp
    dApp
  • Smart Account
    • Creating smart account
      Creating smart account
    • Creating and deploying a script manually
      Creating and deploying a script manually
    • Video tutorials
      • Introduction to the Waves blockchain, Waves Smart Accounts and Waves Smart Assets
        Introduction to the Waves blockchain, Waves Smart Accounts and Waves Smart Assets
      • Waves Smart Account with multisignature
        Waves Smart Account with multisignature
      • Waves Smart Account with escrow service
        Waves Smart Account with escrow service
      • Creating multisignature account via Waves IDE tools
        Creating multisignature account via Waves IDE tools
      • Creating multisignature account via Waves Client
        Creating multisignature account via Waves Client
      • Waves console explained
        Waves console explained
      Video tutorials
    Smart Account
  • Smart Asset
    Smart Asset
  • Developer Tools
    • Waves IDE
      Waves IDE
    • Visual Studio Code Extension
      Visual Studio Code Extension
    • Surfboard
      Surfboard
    • Ride REPL
      Ride REPL
    Developer Tools
  • Signer ◆
    Signer ◆
  • Waves API
    • Data Service API
      Data Service API
    • Node REST API
      Node REST API
    • Node gRPC Server
      Node gRPC Server
    • Blockchain Updates
      Blockchain Updates
    Waves API
  • Client Libraries
    • Waves C#
      • Install SDK
        Install SDK
      • Run Code Sample
        • Send Transactions
          Send Transactions
        • Use Crypto Utilities
          Use Crypto Utilities
        • Interact With Node
          Interact With Node
        • Set Up Smart Contracts
          Set Up Smart Contracts
        Run Code Sample
      Waves C#
    • Gowaves
      • Install SDK
        Install SDK
      Gowaves
    • WavesJ
      • Install SDK
        Install SDK
      WavesJ
    • Ts-lib-crypto
      • Install SDK
        Install SDK
      Ts-lib-crypto
    • Waves-PHP
      • Install SDK
        Install SDK
      Waves-PHP
    • Waves-python
      • Install SDK
        Install SDK
      Waves-python
    • Waves-rust
      • Install SDK
        Install SDK
      Waves-rust
    Client Libraries
      • English
      • Русский
      On this page
      waves_logo Docs

          # Creating smart account

          In this article, we will review the creation of smart account using Waves IDE.

          To create smart account in Waves IDE, complete the following steps:

          1. Open https://waves-ide.com/ in the browser.

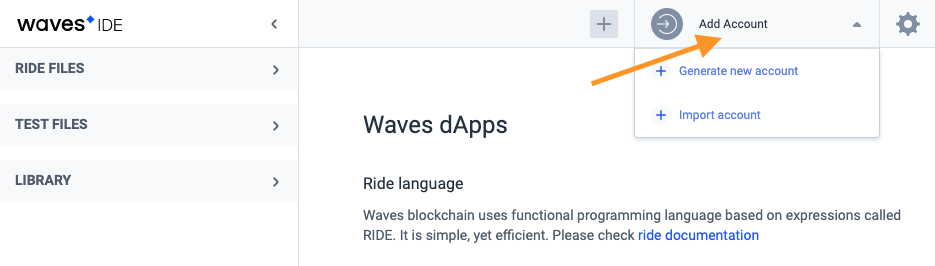
          2. Click Add account in the upper right screen area to open the following drop-down list.

          3. Make one of the following actions:

            • If you already have an account, click Import account in the drop-down list. Make the following actions in the displayed form:

               1. Type in seed in the Seed phrase field.

               2. Come up with an account name and enter it in the Account name field.

               3. Click Import.

            • If you don't have an account yet, click Generate new account in the drop-down list. As a result, the following account attributes will be displayed

               • account address

               • public key

               • private key

               • seed. It is recommended to remind the seed — if you lose it, it will be impossible to restore access to the account.

          4. Click in the upper right screen area. As a result, the drop-down list will be displayed.

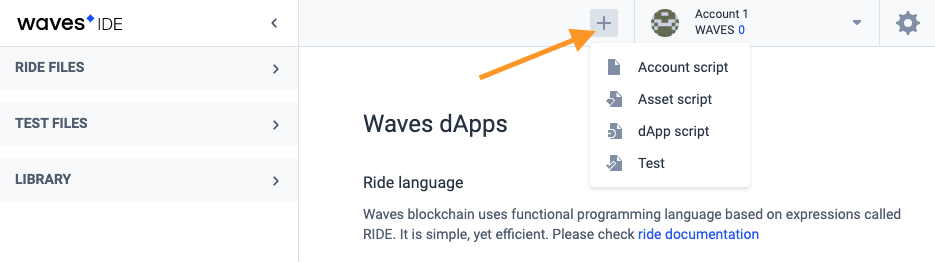
          5. Click Account script. As a result, the tab will be displayed. Write the smart account code in this tab.

          6. Click Deploy when you'll finish with the smart account code.

          Smart Account
          Creating and deploying a script manually
          Smart Account
          Creating and deploying a script manually